Been promising to start a bridge 101 tutorial for a while but until now not been any real demand and been busy with gaining modding experience myself. But I hope this will prove useful for future bridge modders. I'll update as and when necessary.
BASICSLet's get these out of way. Bridge modding not hard: just more complex and time-consuming than ships, with more elements. So needs time, patience and dedication. And of course:
Modelling program (Max is favoured by most)
Graphics paint program that can export/handle tga files (Photoshop or similar)
These will give you a finished bridge model. To get model ingame as a nif with working animations is slighly more complicated and requires Max 3.1 with the stbc exporter. Ask around for advice on where to legally get Max 3.1 or one of the many modders who own it if they might kindly export bridge for you.
STARTING BRIDGETwo important factors to consider when creating bridge:
Orientation
Scale
Useful method for checking both is to import an existing BC bridge. In fact this is a good starter exercise anyway as it's useful to learn how bridges are put together. NifTools has an excellent importer that can be downloaded which allows you to import BC bridge nif into Max.
Orientation is important as all BC bridges (and subsequent animations) are built on an x,y,z axis centred at 0,0,0. Sounds complicated but all apparent once you examine an imported nif and start modelling. If you plan on using an existing viewscreen, you'll need to know the orientation of the corresponding bridge to match your model to that bridge. Otherwise your ingame bridge won't have a viewscreen it can use. But it's just as easy to create your own.
Orientation is also vital if you plan on using an existing model's crew animations as you will need to align your model so its floor, seats, doors etc match the chosen nif. Otherwise your crew will be floating in air and all other horrors.
Imported nifs also give you a chance to compare scale, so your bridge model matches BC parameters and doesn't end up too big or too small for crew to use.
Another useful method for checking scale is to merge into your model the crew skeletons that come with the SDK. Although there is a large skeleton (for Felix character), the medium skeleton will provide a good average for scale/size and give you a good sense of correct scale of bridge dimensions, seats, etc.
 (nb: don't forget to delete them once checked scale)MODELLING & TEXTURING
There are lots of useful tutorials here at BC and on web on how to model and texture/uvw unwrap. It's really a self-learning process, trial and error. I'd never modelled anything in a 3d program before 2008, but inspired by BC modellers I got myself a copy of Max, read all the tutorials I could and took it from there. So completely self-taught as I'm sure is the case with many BC modellers. Max is pretty intuitive and once you get your head around the myriad things it can do to make life easy for you it doesn't take long to create objects. Sure, there will be mistakes, but we've all been through it and gained knowledge from those bad experiences.
Texturing is where your graphics paint program comes in and provides the tga format required by Max. Again, learning to texture is just experimentation and using the existing BC bridge model TGAs as a base guide. The only real restriction on TGAs is that they must conform to strict size guides using multiples of 2/4. Smallest texture size usually 8x8, largest 2048x2048, average around 256x256 to 512x512. While most textures will be equal squares, it's not uncommon to have rectangular textures for parts like doors and lcars panel. But again they must conform to same multiples: so, 256x64, 512x128, 1024x256, etc. What happens if textures don't conform; e.g, 256x250? Texture might show up in Max renders but won't appear in ingame nif; model part will just appear white. So always check texture sizes especially before exporting. And while larger texture sizes will provide greater detail and resolution, especially for areas like lcars, use sparingly as larger textures put greater work on the BC game engine and could slow down lower-end game rigs which many people may still have. Plain areas like wallpaint, carpets, metal etc can easily be covered by small textures while large texture best reserved for areas where need greater resolution like lcars.
But the most important thing to learn is how to 'map' your texture to model parts using the UVW Unwrap modifier. The UVW tutorials here at BC will give you a basic introduction to principles, but again it's best to read up as much as possible as uvw mapping offers many possibilities. If there's any demand, I could write a UVW tutorial for bridges.
So, once your bridge is modelled, textured and uvw mapped, we move on to lighting...
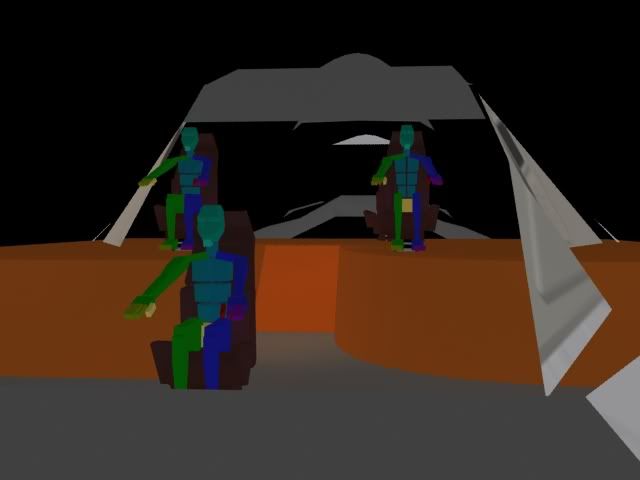
LIGHTINGLightmaps versus nif lighting: it is possible to have a working bridge ingame without lightmaps by exporting to nif with lights. Baz's TWOK bridge and I think a couple of others use this method. Lightmapping is more complicated and time-consuming and involves every single mesh element to be lightmapped. So why bother? Well again, it's a personal choice. Bridges with lights in nif tend to be more uniform, like a brightly-lit room and can't produce shadows. Lightmapped bridges tend to have more shadow and mood as the shadows and light level you adjust and see in render are 'baked' into the mesh via the lightmap textures. The Rotarran bridge is a good example where lightmapped shadows really add to atmosphere of bridge rather than a uniform nif light
LIGHTMAPPINGUnless you've added lights yourself, during modelling you've probably been working and rendering under Max's 'default' light.
(TWOK Bridge early WIP model courtesy of Baz1701)
But now you want to add some atmosphere to the bridge. So you add lights. Again, there are many excellent web guides and tutorials on how to physically light your max scene, ranging from the simple (a single omni light) to the complex (multiple spotlights) to self-illuminated textures (using mental ray or v-ray). The choice is yours. Just a caution: more lights = more complexity and rendering time(and possibility of errors). Many tutorials, though using the same techniques that can be applied to bridge lighting, are intended for rendering as CG scenes or architectural impressions rather than game models, so don't expect same glossy results in BC. Just use the tutorial to learn the principles of lighting and examples of lights to use, then apply those principles and examples to bridge. But best to keep it simple, at least to start with.
For purposes of this tutorial, I'm using just a single omni. (FIG 1)
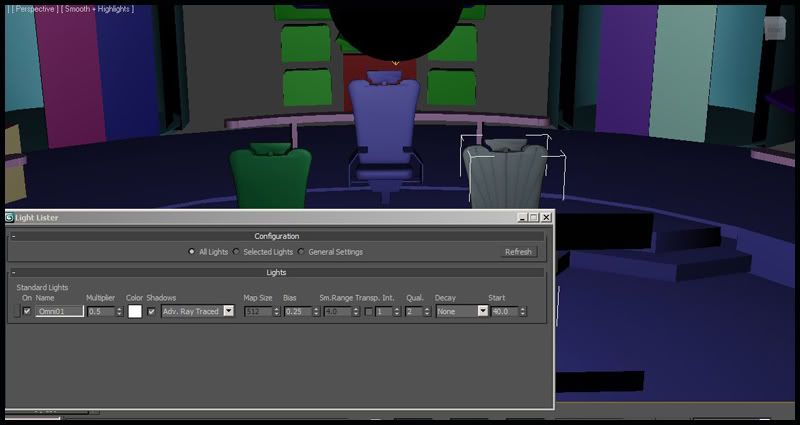
This is standard for many bridges I've made, and more atmospheric effects (shadow gradients, lcar illumination levels) can be added post-rendering via graphics paint program in your lightmap textures. The default level for omni is 1.0, but can be made brighter or (more likely) dimmer depending on your requirements. Default for shadows is Shadow Map, but I find Adv Ray Traced gives cleaner sharper better resolution shadows on large areas like walls, floors and ceilings.
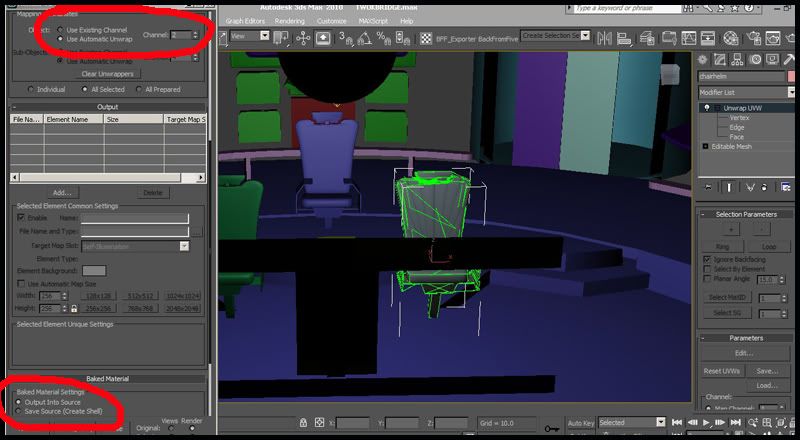
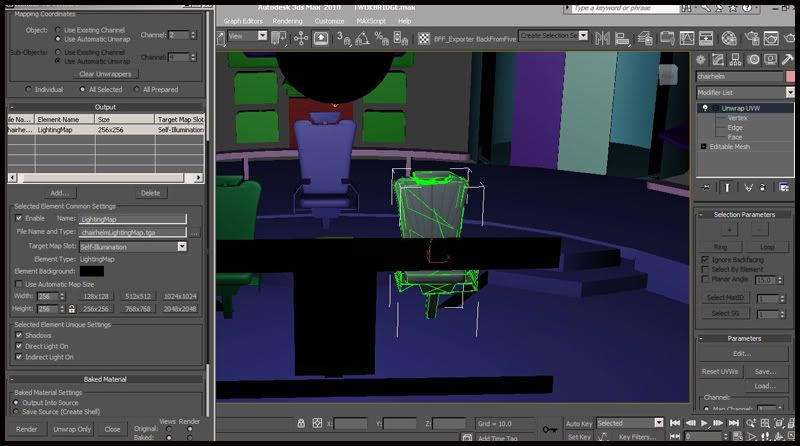
With your light(s) on and a textured/UVW Unwrapped model part selected, time to open Rendering/Render To Texture. Crucial to check in new window is Mapping Coordinates/Use Automatic Unwrap/Channel 2 (lightmaps will not work unless on ch 2) and Baked Material/Output Into Source. (FIG 2a)
If ok, under Output click on Add. In new window select LightingMap and click Add Elements. (FIG 2b)

You will now see options for Selected Element Common Settings (FIG 3)
 Name: LightingMap.
 You can keep as is for now and change after or change to _LM suffix now.
File Name and Type: This is name of your _lm file. If click on the ...button to right, will select where your _lm tga is rendered to. Presumably your high/textures folder of model WIP.
Target Map Slot: should always be Self-Illumination
Map Size: 256x256 usually ok for most _lm and keeps loading times down. Large shadowed areas like floors, walls and ceilings may look better rendered at 1024 or higher.
Element Unique Settings: best to experiment with these by doing different renders. As a general rule I find shadows and direct light on is best.
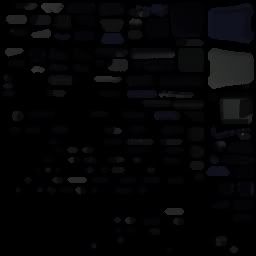
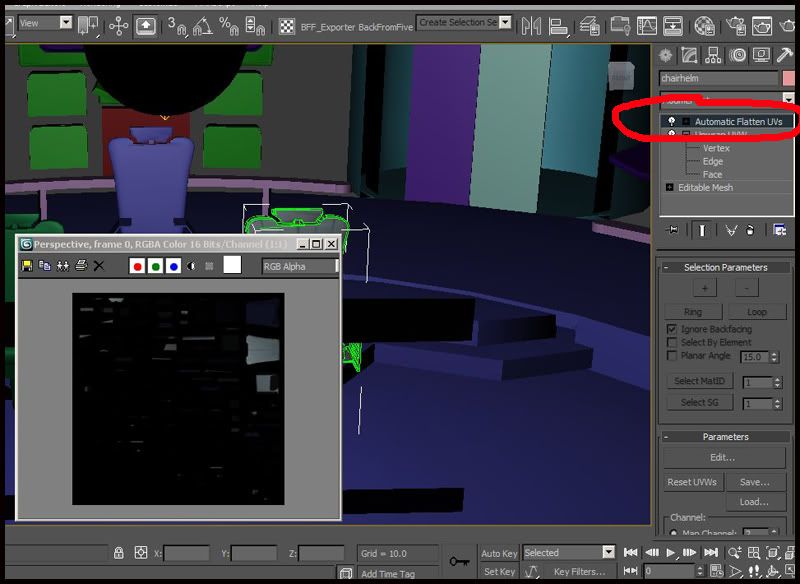
Once all set, hit Render. Max will create a rendered -lm tga (FIG 4) and you will see a new modifier: Automatic Flatten UVs above the UVW Unwrap (FIG 5)
 nb: You can either keep this new flattened UV, or if you prefer the _lm UV to match your texture - useful for lcars or if you want to add gradients to walls - then load your UnwrapUVW uvw (assuming you've already saved it - good practice to) and re-render.
 To test lightmap works, turn off your omni light (or all light sources). Your mesh scene will be completely black. Now render.
Everything should still be black
except for your lightmapped object (FIG 6b).
 If lightmapped object too dark or light for taste, you can adjusting lighting level and re-render. Or adjust brightness in graphics paint program. Again, matter of personal preference.
That's it. Now just repeat process for all other objects in scene.
EXPORTING FROM MAX TO MAX 3.1Once you're happy your scene is fully textured and lightmapped (or nif lit), you need to export it in a format that can be imported into Max 3.1.
The only practical way to do this is to use Bobo's BFF format. The great benefit of BFF is that exports the entire mesh and material library so that once imported into Max 3 you have your original later Max model complete with original textures all in place.
Download with full instructions and how to use on Bobo's website:
http://www.scriptspot.com/bobo/darkmoon/bff/ Once installed and run, BFF will export your bridge as a .ms script /folder that can be read by Max 3. If sending bridge or model to a Max 3 modder, be sure to include ms script and folder along with textures and lightmaps.
This ends initial bridge tutorial. Hopefully at some future stage I'll be able to add tutorials on the following:
BRIDGE MODDING IN MAX 3Importing from later Max
Animations: crew / chairs / crew walks / doors
Gamma/Normal and Red Alpha Glow
Exporting to nif
BRIDGE SCRIPTING  Topic: BRIDGE MODDING 101 (Read 1795 times)